Category: Coding

Spring Planting Planner

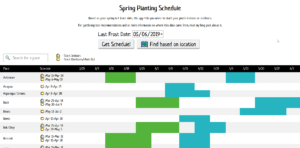
My office recently hosted a “Hack-a-thon”, where we could build whatever we wanted to build.  I spend some time on the first day learning some new technology from some co-workers, but the second day I started to build an app that I had wanted to build for a while: a spring planting planner scheduler.  Basically, the concept is it tells you when to start seeds indoors or outdoors based on your local last frost date, which is critical because a miscalculation could kill your plants.

Inspiration and Data: Patrick at One Yard Revolution

There are similar apps out there, but the data from mine is from a YouTube gardener named Patrick Dolan.  His channel is called One Yard Revolution and he’s my favorite YouTube gardener due to his philosophy of using free, local resources and using the least amount of effort for maximum yields.  Patrick is willing to change his practices based on his own trials and peer reviewed research and he shares his success and failures on his channel.  He transformed his backyard into a yearlong garden with raised beds, low tunnels, and a hoop house.  That’s impressive since he lives in a suburb of Chicago.

A few years ago he released a similar tool, but it is build in Excel/Google Sheets and isn’t the most user friendly if you aren’t comfortable in Excel.  It was supremely valuable to me, and was the main inspiration for my app.

For the location-based frost-date data, I’m using the Farmsense API data to get the nearest NOAA station and then the average last spring frost date.  I’m going with the date that has 30% probability at 32 degrees.

The app

This app was a labor of love, but if you want to support me and my efforts, you buy one of my garden tool recommendations or just send me some money via PayPal.

https://jimmypautz.com/plants/

Continue reading

Amazon Affiliate Linkerizer: Firefox and Chrome extension

Since I do product reviews and lots of product research, I’m frequently posting Amazon links.  To help me send better links and make me a small amount of affiliate money, I made a new Firefox and Chrome extension.

If you use it without adding any affiliate code, your purchases support me and this blog.

Based on a project I found on Github, Amazon Affiliate Linkerizer puts a button in your browser on Amazon pages.  When you click it, it cleans up the link and add an affiliate code to the end.  The code is customizable per the options page…otherwise it supports me with my affiliate code.   If you use it without adding any affiliate code, your purchases support me and this blog.

If you want to try out this plugin, get it for Firefox or Chrome:


I could release it for Microsoft Edge, but I don’t want to pay the $25 developer fee.  (My company paid the $5 developer fee for Chrome, since I had a work-related extension first.)

If you are a programmer, check out the project on Github.

Fake Submodules in Git

The current project I’m working on for my new church website requires me to have a Git repository inside of another Git repository.  Typically when you do this, Git assumes you want to use a “feature” called submodules.  You probably don’t. I read up on submodules and don’t see any use case for them.  (There likely is one, of course, but this wasn’t it.)

It took a bit of searching, but if you add a “/” to the end of the folder that contains your nested repo when you are running  git add, you can fake the parent repo into acting how you’d expect, and not ignore everything inside.

Thanks to Felix from debuggable.com!

Setting up git for deploying website updates (Dreamhost and other hosts)

For this site and the blog I built for my company, I use WP Engine, a WordPress host (which I can definitely recommend).  WP Engine has a built in staging environment as well as the option to deploy to staging or production via Git.  If you don’t know what Git is, you can probably stop reading now.  If you are still here and want to know about Git, lmgtfy.

I’m currently working on a new website for my church, as the current site looks like this:

Since WP Engine can be costly, and Dreamhost offers free hosting for non-profits, we are going to save some money and go that route.  Since I’ve come to enjoy the ease of deployments with Git on WP Engine, I immediately started looking for a way to do the same thing with Dreamhost.

I don’t have a staging environment (nor do I need one for this project presently), but otherwise the end result is nearly the same.  Thanks to Brandon Evans for the bulk of the setup, and Etel Sverdlov on Digital Ocean for the SSH setup instructions.

SSH into your server and init the repo

  1. Make sure you have shell access to the server, in my case, Dreamhost has a wiki article on how to enable.  Other hosts, if they give this access, likely have a similar setting.
  2. ssh into your server:
    ssh [email protected]
    and enter your password.
  3. Make sure git is installed on your server.  If it is not, there are a number of ways to do this.  Here is how Dreamhost suggests…if you have terminal access, just use apt-get.  I didn’t have to do any of this, since git was already present on my server.
  4. Create the directory that you want to house the repository:
    mkdir website.git && cd website.git
    git init --bare

    Notice that we are creating a bare repository.   Per Jon Saints, bare repositories are for sharing, as opposed to the standard git init repos that are for working.

  5. The bare repository is now created, but we aren’t done. We need to have the files we push to the new repository automatically moved to the folder we need them in.  In my case, it was the website (WordPress theme) directory.
    cat > hooks/post-receive
    
    #!/bin/sh
    git --work-tree=path_to_folder --git-dir=git_repo.git checkout -f
  6. When you’re done typing everything from #! (hash-bang) to checkout -f, type control-d to save the file.
  7. Next run
    chmod +x hooks/post-receive

    to allow that file to be executed by the system.

  8. Next we need to exit SSH

Add the new repository locally as a git remote

This is pretty standard git and I don’t think I need to outline this for you.  One thing to note is the location of your remote:

git remote add web ssh://user@yourdomain.com/home/user/yourRepo.git

Copy your ssh key to the remote

cat ~/.ssh/id_rsa.pub | ssh [email protected] "mkdir -p ~/.ssh && cat >> ~/.ssh/authorized_keys"

This lets you not have to enter your password every time, similar to an ssh setup in github.

You’re done!

Now you can git push to your new remote repo.  You’ll get a message like this if you are successful:

Counting objects: 30, done.
Delta compression using up to 4 threads.
Compressing objects: 100% (17/17), done.
Writing objects: 100% (17/17), 5.16 KiB, done.
Total 17 (delta 11), reused 0 (delta 0)

I don’t consider myself an expert, but wanted to share since it took me a bit to get a grasp on all the steps needed.   Thanks again to Brandon Evans for the bulk of the setup, and Etel Sverdlov on Digital Ocean for the SSH setup instructions.

CMS Exploration – WordPress, Orchard, Titan, & Sharepoint

At my day job I was given the task of finding a blog solution for my company’s internal Titan CMS website.  The site is built on Titan CMS, a powerful and expensive enterprise level Content Management System built with ASP.net.  It is good for big sites, with excellent file and site structure.  The downsides to this CMS is its cumbersome nature with some simple tasks, the load times can be slow sometimes, and it has no blogging engine.  (Plus you are shelling out 100 grand+ for the license.)  Titan and I have a love-hate relationship.  Since it has no blogging engine, I was tasked to find a solution that would be self-hosted and would provide a seamless transition visually from the existing site to the blog.

The first solution that was given to me was using the blogging feature in Sharepoint, which my company already owns.  There were some server security and logistics issues that made this a little more difficult, so in the meantime I entertained other options.

My first choice was, of course, WordPress.  This site is built on it and I have a solid level of experience custom theming WordPress sites.  I was excited that I could use WordPress for my day job so I started coding the custom theme to match the current intranet site.  I finished it in about a day and it looked great.  I did this locally on my work PC.  After my supervisor saw and approved it, I went over to IT to have it installed on the server.  It was then I found out that mySQL is feared in the world of MS SQL-only IT.  They were not comfortable installing mySQL, so WordPress was no longer an option.  This deeply saddened me.

%image_alt%I then set out to find a self-hosted blogging platform that would be run on MS SQL.  I then encountered Orchard CMS a Microsoft sponsored open source CMS.  It is built with ASP.NET MVC, so I was rather lost to start.  It uses a more logical syntax because of the MVC so I was able to almost figure out theming in Orchard.  PHP makes much more sense to me.  When I was ready with an Orchard theme I went back to IT and was told, “We would prefer not to install any other CMS’s on that server”.

Frustrating.

We were left with Sharepoint, which I messed around with unsuccessfully.  ASP.NET is messy for someone not familiar with the language (and more used to WordPress’ PHP).  We are now working on getting training/help with the branding of Sharepoint to be used for our internal blog.  We’ll see how long it takes.

Learning is important when you are employed by the internet; as a web designer, I relish learning new technologies.

Learn to code!

I know how to write HMTL, CSS, and limited PHP.  I can add a jQuery plugin to my website if it is basic and has good instructions.  I can’t write Javascript….yet.

Recently I signed up for Codecademy, a new startup that teaches users how to code Javascript for free.  In the future, they plan to add more courses, but for now it is just Javascript.  It is very interactive and teaches you by making you do it.  As you progress through the different courses, they award you points and badges (so you can compete with friends).  View my profile.

I look forward to learning more code so I can program better for the web!

%image_alt%


Vertical CSS Timeline

My supervisor had a really good idea for our new company internal website: a timeline of our company’s history.  It is a 100+ year old company so it really makes sense to create an interactive timeline, especially for the benefit of new employees (like myself).   So, naturally, I googled “CSS Timeline” to see what is out there already.

%image_alt%Mostly I found horizontally scrolling timelines, many of which required some Javascript or jQuery.  I already had a couple jQuery plugins for this company website, and I didn’t want to have to deal with plugins interfering with each other (plus the CMS doesn’t give you a lot of freedom to extend functionality like this).  Also, I love just doing things with basic HTML and CSS.  Simple is usually better.

Some vertical CSS timelines I found were nice, but not degradable down to older browsers or they were boxy and ugly.  So I decided to make my own, based somewhat on a cool concept for an organizational chart.  I made it straightforward, semantic, and browser compatible all the way back to IE7. It is also responsive to different browser window sizes (you can actually read it in a mobile browser).

The HTML is very simple.  For the sake of semantics, I used ordered lists (timelines flow in order).  First I ordered the top “Jump Strip” bar for easy access to decades.
Continue reading

CSS Tooltips (no javascript or jQuery)

It was requested of me at work to figure out a way to make hover tooltips that look nice and are do-able.  The content management system my company paid for (that I have to work with every day) is powerful, but it is not always easy to do things or extend it with plugins.  Incorporating jQuery plugins can be difficult (I tried 3 different lightbox renditions before I was successful).  I wanted something that was easy to add to this CMS and looked decent.  I figured it could be done in only CSS, especially with the power of CSS3, so I googled it.  I came across Six RevisionsSexy Tooltips with Just CSS“.  I was very pleasantly surprised and immediately worked out the code for myself adjusted it and used for my company’s website.

I liked it so much, in fact, that I replaced the jQuery plugin vTip (the website for this doesn’t exist anymore) with the “Sexy CSS” method.  Check it out in practice on my portfolio page.

Here is an example of the HTML: Continue reading

© 2024 Jimmy's Sweet Blog

Theme by Anders NorenUp ↑

Jimmy's Sweet Blog