
I’ve always been a fan of WordPress and what they do. WordPress is free, open source, and really powerful. It is also really easy to use and to setup. There is a huge community behind it and it is my preferred choice of CMS for the websites I manage. Many people criticize/look down upon WordPress, and I agree that it isn’t perfect, but it also doesn’t deserve the hate…even for Gutenberg. Gutenberg is the next generation editing experience for WordPress. It was released in late 2018, and is very (overly) “block”-focused and built in modern JavaScript. It also is far from ready to be in production for millions of users.
Category: Web Development

My last post was about setting up Git on a remote server. The git setup worked well for me and I used it for a good number of months, but I couldn’t stomach Dreamhost anymore. As we get closer to launch, I was frustrated with the speed of the site, both front and back end. I did the best I could to speed up the site: cache, a CDN, fewer plugins, but it wasn’t me. The hosting plan was too slow.
Ultimately I switched the site over to WP Engine. I’ve used them for years and have been very happy. Their hosting has a lot going for them: performance, their management panel, and customer service (the one time I needed them).
After the switch the speed is where it should be. Dreamhost’s free free non-profit program is great, but their shared hosting is slow.
For this site and the blog I built for my company, I use WP Engine, a WordPress host (which I can definitely recommend). WP Engine has a built in staging environment as well as the option to deploy to staging or production via Git. If you don’t know what Git is, you can probably stop reading now. If you are still here and want to know about Git, lmgtfy.
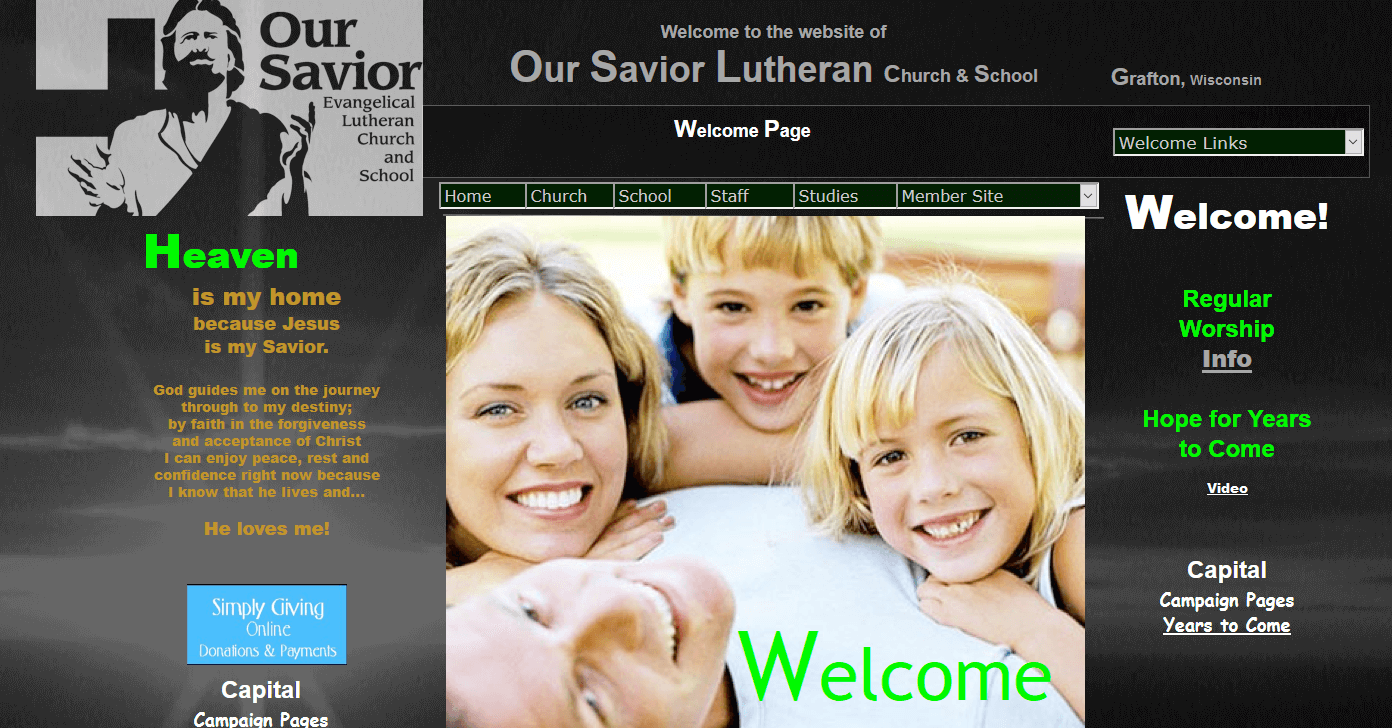
I’m currently working on a new website for my church, as the current site looks like this:
Since WP Engine can be costly, and Dreamhost offers free hosting for non-profits, we are going to save some money and go that route. Since I’ve come to enjoy the ease of deployments with Git on WP Engine, I immediately started looking for a way to do the same thing with Dreamhost.
I don’t have a staging environment (nor do I need one for this project presently), but otherwise the end result is nearly the same. Thanks to Brandon Evans for the bulk of the setup, and Etel Sverdlov on Digital Ocean for the SSH setup instructions.
SSH into your server and init the repo
- Make sure you have shell access to the server, in my case, Dreamhost has a wiki article on how to enable. Other hosts, if they give this access, likely have a similar setting.
- ssh into your server:
ssh [email protected]
and enter your password. - Make sure git is installed on your server. If it is not, there are a number of ways to do this. Here is how Dreamhost suggests…if you have terminal access, just use apt-get. I didn’t have to do any of this, since git was already present on my server.
- Create the directory that you want to house the repository:
mkdir website.git && cd website.git
git init --bare
Notice that we are creating a bare repository. Per Jon Saints, bare repositories are for sharing, as opposed to the standard
git initrepos that are for working. - The bare repository is now created, but we aren’t done. We need to have the files we push to the new repository automatically moved to the folder we need them in. In my case, it was the website (WordPress theme) directory.
cat > hooks/post-receive #!/bin/sh git --work-tree=path_to_folder --git-dir=git_repo.git checkout -f - When you’re done typing everything from
#!(hash-bang) tocheckout -f, type control-d to save the file. - Next run
chmod +x hooks/post-receiveto allow that file to be executed by the system.
- Next we need to
exitSSH
Add the new repository locally as a git remote
This is pretty standard git and I don’t think I need to outline this for you. One thing to note is the location of your remote:
git remote add web ssh://user@yourdomain.com/home/user/yourRepo.gitCopy your ssh key to the remote
cat ~/.ssh/id_rsa.pub | ssh [email protected] "mkdir -p ~/.ssh && cat >> ~/.ssh/authorized_keys"This lets you not have to enter your password every time, similar to an ssh setup in github.
You’re done!
Now you can git push to your new remote repo. You’ll get a message like this if you are successful:
Counting objects: 30, done.
Delta compression using up to 4 threads.
Compressing objects: 100% (17/17), done.
Writing objects: 100% (17/17), 5.16 KiB, done.
Total 17 (delta 11), reused 0 (delta 0)
I don’t consider myself an expert, but wanted to share since it took me a bit to get a grasp on all the steps needed. Thanks again to Brandon Evans for the bulk of the setup, and Etel Sverdlov on Digital Ocean for the SSH setup instructions.
At my day job I was given the task of finding a blog solution for my company’s internal  website. The site is built on Titan CMS, a powerful and expensive enterprise level Content Management System built with ASP.net. It is good for big sites, with excellent file and site structure. The downsides to this CMS is its cumbersome nature with some simple tasks, the load times can be slow sometimes, and it has no blogging engine. (Plus you are shelling out 100 grand+ for the license.) Titan and I have a love-hate relationship. Since it has no blogging engine, I was tasked to find a solution that would be self-hosted and would provide a seamless transition visually from the existing site to the blog.
The first solution that was given to me was using the blogging feature in Sharepoint, which my company already owns. There were some server security and logistics issues that made this a little more difficult, so in the meantime I entertained other options.
My first choice was, of course, WordPress. This site is built on it and I have a solid level of experience custom theming WordPress sites. I was excited that I could use WordPress for my day job so I started coding the custom theme to match the current intranet site. I finished it in about a day and it looked great. I did this locally on my work PC. After my supervisor saw and approved it, I went over to IT to have it installed on the server. It was then I found out that mySQL is feared in the world of MS SQL-only IT. They were not comfortable installing mySQL, so WordPress was no longer an option. This deeply saddened me.
 I then set out to find a self-hosted blogging platform that would be run on MS SQL. I then encountered Orchard CMS a Microsoft sponsored open source CMS. It is built with ASP.NET MVC, so I was rather lost to start. It uses a more logical syntax because of the MVC so I was able to almost figure out theming in Orchard. PHP makes much more sense to me. When I was ready with an Orchard theme I went back to IT and was told, “We would prefer not to install any other CMS’s on that server”.
Frustrating.
We were left with Sharepoint, which I messed around with unsuccessfully. ASP.NET is messy for someone not familiar with the language (and more used to WordPress’ PHP). We are now working on getting training/help with the branding of Sharepoint to be used for our internal blog. We’ll see how long it takes.
Learning is important when you are employed by the internet; as a web designer, I relish learning new technologies.
When jamespautz.com first launched, I found a really good deal with Dreamhost, so I signed on for a year. Their regular price was a bit more, but it wasn’t horrible at the time. When that first year was up they had raised the price by $3 per month and they also charged extra for decent customer service. I didn’t have any problems with them, but I couldn’t afford to sign on again.
 I decided to shop around a bit. It was then I came across a good deal that I could sign on for multiple years, essentially saving me $25 and some. It was through IX Web Hosting. The setup went great, domain transfer and hosting, but after a couple months I noticed a that my site was seeing some downtime. (It happened for me two days in a row.)
It was then I decided to monitor more closely, so I signed up for a free account at Pingdom.com. Pingdom is great. It can ping your site every minute if you want, it will notify you if you want, it gives you a nice display of statistics, similar to Google Analytics. Needless to say, my site’s uptime wasn’t doing so great. In the first 2 days I had almost 4 hours combined downtime, some periods up to 18 minutes at a time.
This prompted me to contact IX. IX has great, prompt customer service. The people you talk to on the phone are easy to understand and nice. They don’t, however, do much to help you if your site is seeing downtime. They tried a few things, but my site was still seeing only 93% uptime (as opposed to the the promised 99.9%). They even told me I would have better luck upgrading to a Dedicated Server (which would cost more).
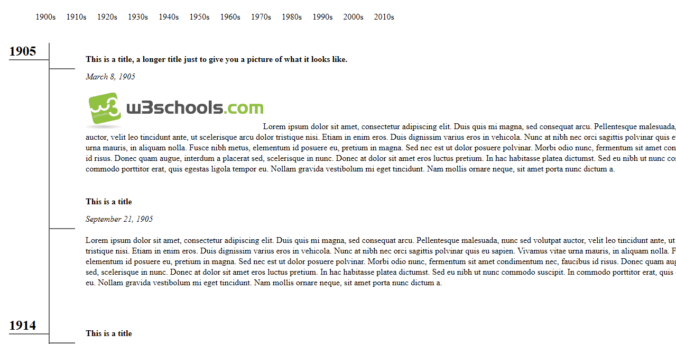
My supervisor had a really good idea for our new company internal website: a timeline of our company’s history. It is a 100+ year old company so it really makes sense to create an interactive timeline, especially for the benefit of new employees (like myself). So, naturally, I googled “CSS Timeline” to see what is out there already.
 Mostly I found horizontally scrolling timelines, many of which required some Javascript or jQuery. I already had a couple jQuery plugins for this company website, and I didn’t want to have to deal with plugins interfering with each other (plus the CMS doesn’t give you a lot of freedom to extend functionality like this). Also, I love just doing things with basic HTML and CSS. Simple is usually better.
Some vertical CSS timelines I found were nice, but not degradable down to older browsers or they were boxy and ugly. So I decided to make my own, based somewhat on a cool concept for an organizational chart. I made it straightforward, semantic, and browser compatible all the way back to IE7. It is also responsive to different browser window sizes (you can actually read it in a mobile browser).
The HTML is very simple. For the sake of semantics, I used ordered lists (timelines flow in order). First I ordered the top “Jump Strip” bar for easy access to decades.
Continue reading
It was requested of me at work to figure out a way to make hover tooltips that look nice and are do-able. The content management system my company paid for (that I have to work with every day) is powerful, but it is not always easy to do things or extend it with plugins. Incorporating jQuery plugins can be difficult (I tried 3 different lightbox renditions before I was successful). I wanted something that was easy to add to this CMS and looked decent. I figured it could be done in only CSS, especially with the power of CSS3, so I googled it. I came across Six Revisions “Sexy Tooltips with Just CSS“. I was very pleasantly surprised and immediately worked out the code for myself adjusted it and used for my company’s website.
I liked it so much, in fact, that I replaced the jQuery plugin vTip (the website for this doesn’t exist anymore) with the “Sexy CSS” method. Check it out in practice on my portfolio page.
Here is an example of the HTML: Continue reading
 This website and blog are my first attempts at creating a responsive website. This website will change its look to be optimized for any reasonable screen size, from smart phones to desktop computers.
I used the CSS media queries method to adjust the styling of different elements of this website on different size screens.
It isn’t perfect by any means, but you can’t learn something without trying. If you do notice some problems or just have comments on improving this page, please leave me a comment on this post.
Recent Comments